
How I built a Lego Rack for the Intel NUCs
I wrote about my new mini lab in this post recently, where I mentioned the fact that I had built a rack out of legos for my Intel NUCs. I had also posted a few pics of my set-up on Twitter and Reddit and I got quite a few requests to write a set of detailed build instructions for the Lego House Rack.
Note: No musical sensibilities were harmed during the writing of this blog post. Ed Sheeran’s Lego House was not played even once… ![]()
The story
There are some quite nice looking Lego based racks around the Web. For example, the awesome Lego VSAN EVO Rack by Nicholas Farmer, or the also brilliant Fun with Legos and Intel NUCs by Andy Smith. Problem is, nobody is writing any guides on how to build the little beasties…
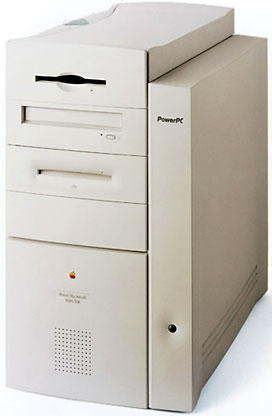
For my build, I wanted to mix (I mean, steal) the best aspects of both Nicholas’ and Andy’s designs. I started by examining their pictures and then came up with a design, initially sketched on paper, so that I could have a basic idea of the number of bricks required. The overhang column seen on my design was inspired by the case design of the Power Macintosh 8600/9600 with the side compartment for the motherboard:
But, I must confess that it was a lot of trial and error and that I didn’t keep the best of notes as I was building the rack. For this guide, in the spirit of helping the community, I sucked it up and dismantled the rack to document the build again…
Pick a Brick
It turned out to be very difficult to source the Lego bricks I needed for this build. I initially thought about a blue and black build (like the EVO), but blue bricks were very hard to come by. I suspect my friends in the US of A will have better luck…
Even the black stackable base plates are now hard to find in the UK (other colours available). They are available directly from Strictly Briks, though.
Bill of Materials (BOM)
| Quantity | Type | Colour | Size |
|---|---|---|---|
| 1 (pack of 10) | Stackable Plates | Black | 20x20 (6” x 6”) |
| 2 | Brick | Black | 1x16 |
| 4 | Brick | Black | 1x8 |
| 64 | Brick | Grey | 2x6 |
| 48 | Brick | Black | 2x6 |
| 14 | Brick | Grey | 2x4 |
| 8 | Brick | Black | 2x4 |
| 2 | Brick | Black | 1x4 |
| 8 | Brick | Grey | 2x2 |
| 24 | Brick | Black | 2x2 |
| 18 | Brick | Grey | 1x4 |
| 2 | Brick | Grey | 1x3 |
| 1 | Brick | Grey | 1x2 |
| 4 | Corner Brick | Grey | 1x2 |
| 4 | Roof Tiles | Black | 2x8/45˚ |
| 2 | Roof Tiles | Black | 2x4/45˚ |
| 8 | Flat Tiles | Grey | 1x8 |
| 2 | Flat Tiles | Grey | 1x6 |
| 4 | Flat Tiles | Grey | 1x4 |
| 2 | Flat Tiles | Grey | 1x2 |
| 9 | Flat Tiles | Black | 1x6 |
| 5 | Flat Tiles | Black | 1x4 |
| 4 | Flat Tiles | Black | 1x1 |
| 2 | Arch Continuous Bow | Black | 1x6 |
| 2 | Plate | Grey | 2x16 |
| 4 | Plate | Grey | 2x12 |
| 6 | Plate | Grey | 2x10 |
| 5 | Plate | Grey | 2x8 |
| 3 | Plate | Grey | 2x6 |
| 2 | Plate | Grey | 2x4 |
| 2 | Plate | Grey | 1x2 |
| 2 | Angle Plate | Grey | 1x2/2x2 |
| 4 | Hinge Plate Locking Dual Finger on End | Black | 1x2 |
| 4 | Hinge Plate Locking Single Finger on Top | Grey | 1x2 |
Other than the bricks and plates above, I also used the following items to complete the rack door:
- Midwest Polyester Clear Sheet 0.06 mm Single
- Stix2 Self-Adhesive Magnetic Tape
- Modelcraft Universal Razor Saw
The Build in Pictures (and words)
I spent a considerable amount of time thinking about what size rack I wanted to build. I had seen the Strictly Briks’ Stackable Base Plates before and noticed that Andy had used them for his own rack, so it was just a question of selecting a size that was enough to accommodate the NUCs.
I decided to go with the smallest of the bases, which are available in sizes of 20x20 (brick dots), 22x26, 32x32 and even 50x50 (from other vendors); the larger plates just seemed too big for the look and proportions I wanted to achieve. However, the first build looked a bit boring, so I ended up having to come up with a way of extending the plates somehow, which then allowed me to incorporate the side overhang to my design.
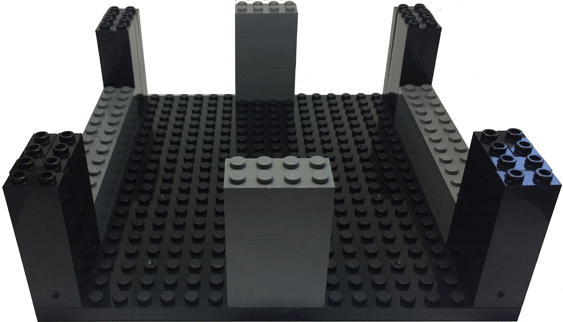
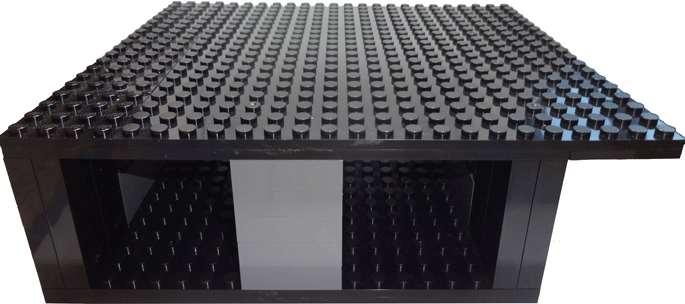
Ground Floor
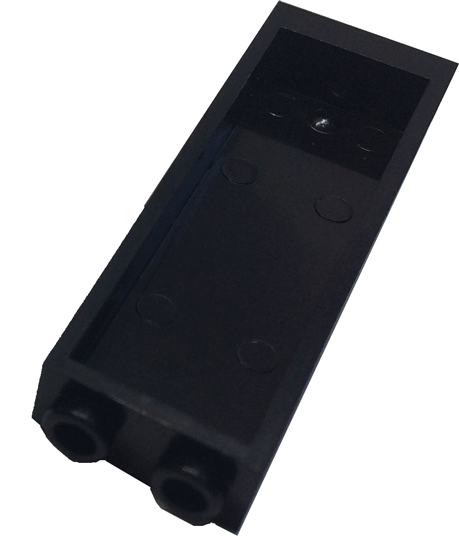
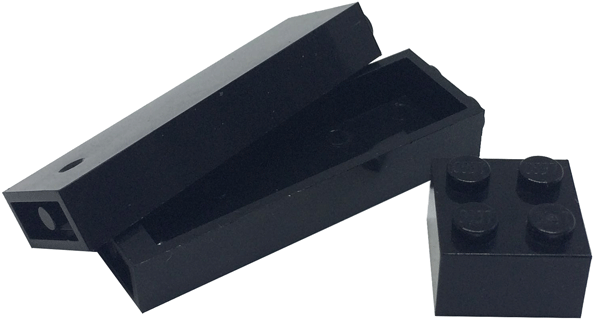
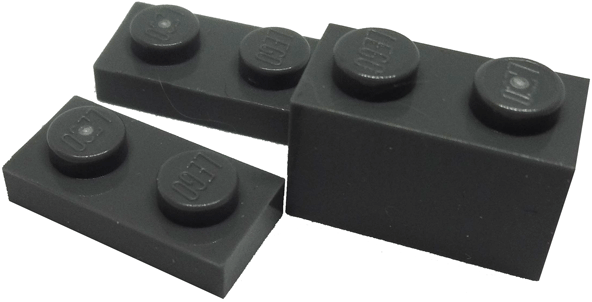
The basic building blocks are the Strictly Briks Stackable Plates and the hollow building bricks that come with them. When two of these bricks are joined together, they form a nice 2x2x5 smooth column.
BOM for this section:
| Quantity | Type | Colour | Size |
|---|---|---|---|
| 2 | Plates | Black | 20x20 |
| 16 | Stackable/Column Brick | Black | 1x16 |
| 8 | Brick | Grey | 2x6 |
| 10 | Brick | Grey | 2x4 |
| 8 | Brick | Black | 2x6 |
Step 1
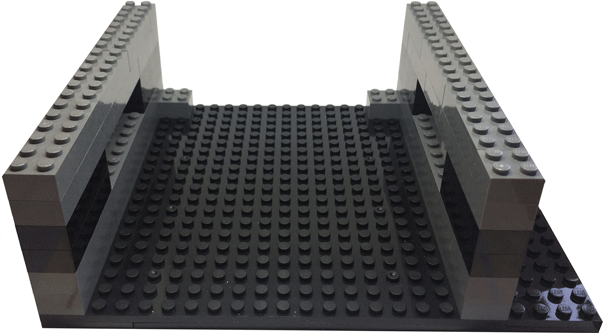
Sandwich together two of the base plates and add four building blocks to each corner to form a 4x2x5 column.
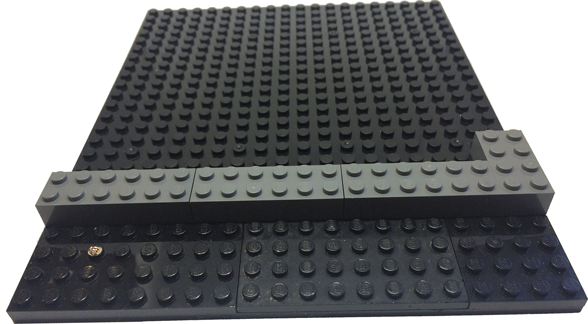
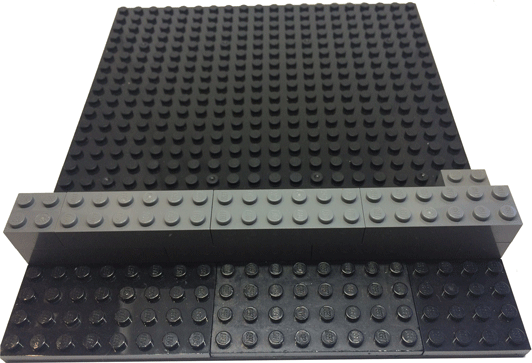
Step 2
Two sides of the base plate will have a narrower gap: stick four 6x2 grey bricks (two over two) to complete the lower side wall.
Step 3
Build the front and back “partition” walls by stacking five 4x2 grey bricks right in the middle of the opening:
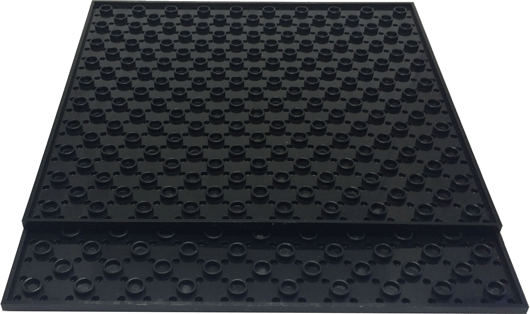
Step 4
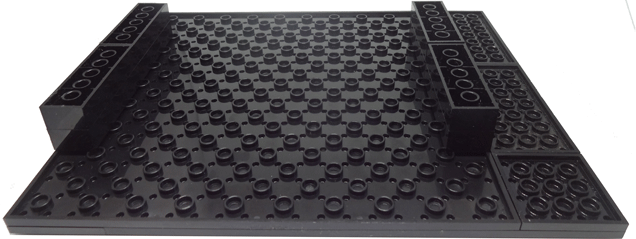
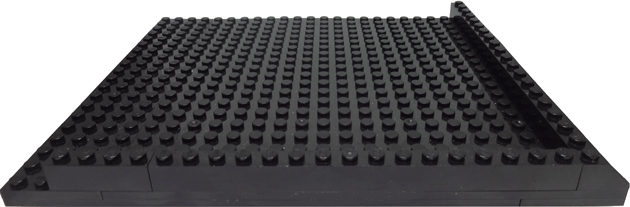
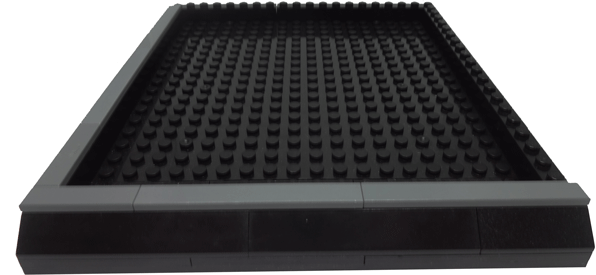
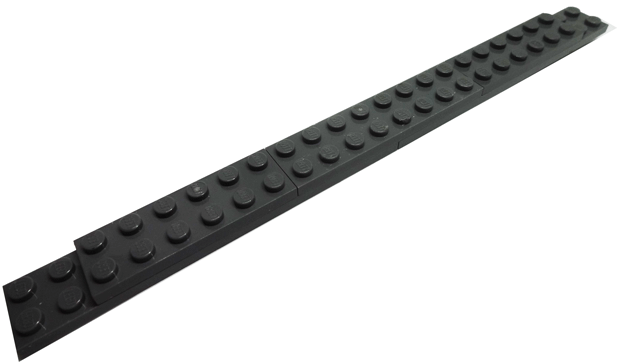
It is now time to put together the second pair of plates, which will enclose the base and serve as the 1st level “floor”. As I decided to have a kind of overhang on one side of the rack, two plates will be placed on top of each other, but this time the top one will be offset by four “dots”.
Step 5
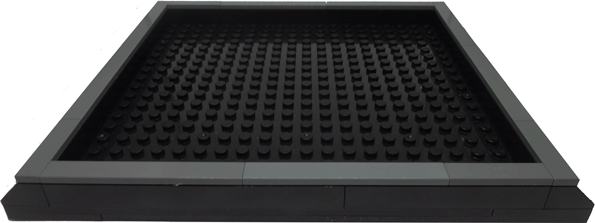
We are left with a “step-down” at one end of both the top and bottom of the combined plate, which will need to be filled up with two 4x8 and one 4x4 plates on each side.
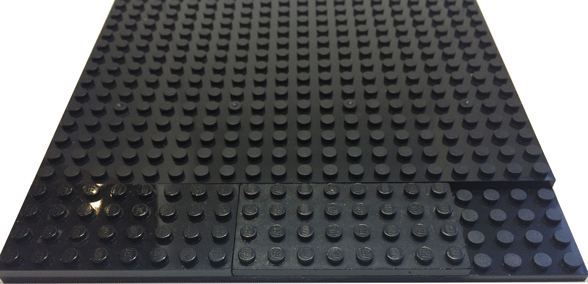
Once done, the base plates for the 1st, and subsequent floors, will have an overall size of 24 dots (w) by 20 dots (d).
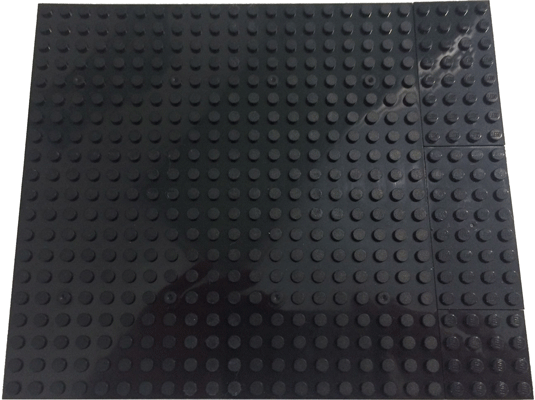
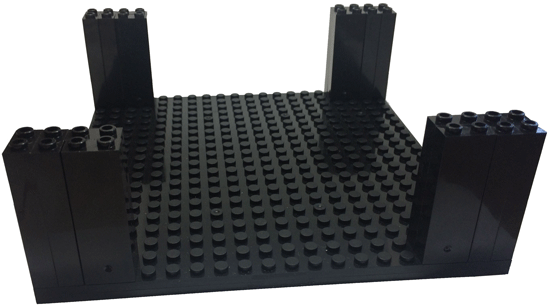
Step 6
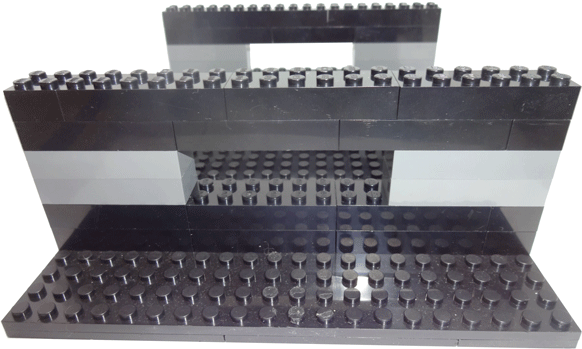
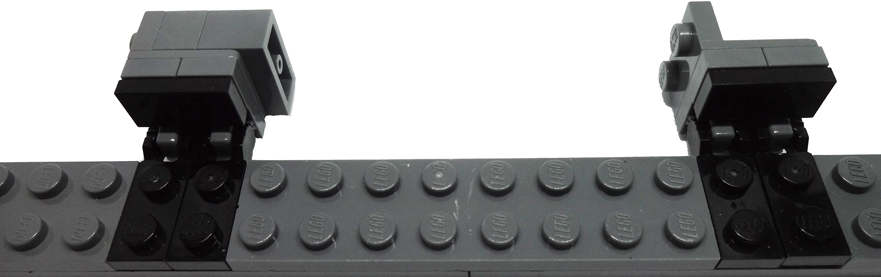
Turn the baseplate upside down and add to the middle of the short edges four 2x6 black bricks (two over two); on one side, right on the edge, and on the other offset by four dots. Those will form the upper half of the side wall of the base, including a gap in the middle.
Finally, place the assembled 1st level plate over the base.

First Floor
BOM for this section:
| Quantity | Type | Colour | Size |
|---|---|---|---|
| 2 | Plates | Black | 20x20 |
| 4 | Plates | Black | 4x8 |
| 2 | Plates | Black | 4x4 |
| 4 | Stackable/Column Brick | Black | 1x16 |
| 24 | Brick | Grey | 2x6 |
| 2 | Brick | Grey | 2x4 |
| 6 | Brick | Grey | 2x2 |
| 8 | Brick | Black | 2x6 |
| 2 | Brick | Black | 2x2 |
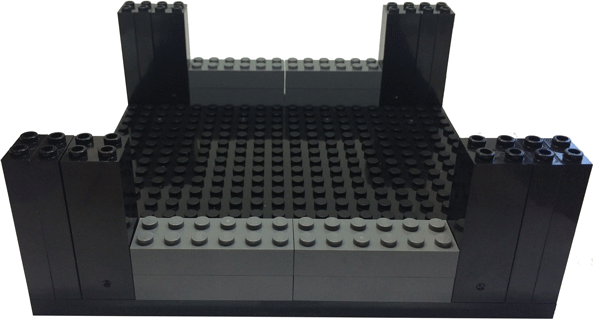
Step 7
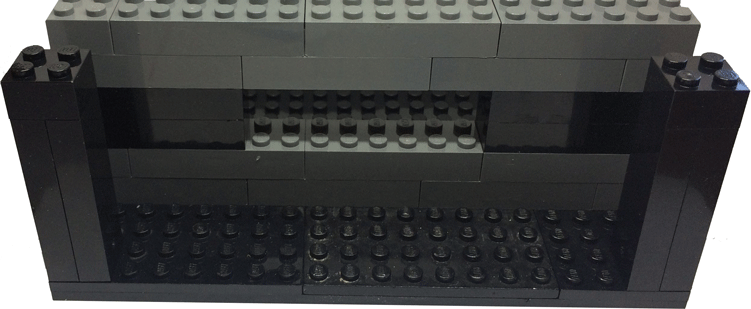
The first floor build starts by adding the side walls to the base plate (floor). Place three 2x6 grey bricks along the overhang edge (offset by four dots) and finish off with a 2x4 brick running lengthwise along the bottom edge of the plate.
Start the second row with a 2x2 grey brick, followed by three 2x6 grey bricks.
Rows 3 and 4 are built with 2x6 black bricks only, leaving a gap in the middle; rows 5 and 6 are built with 2x2 and 2x6 black bricks – I started with the 2x2 bricks at different ends of the plate.
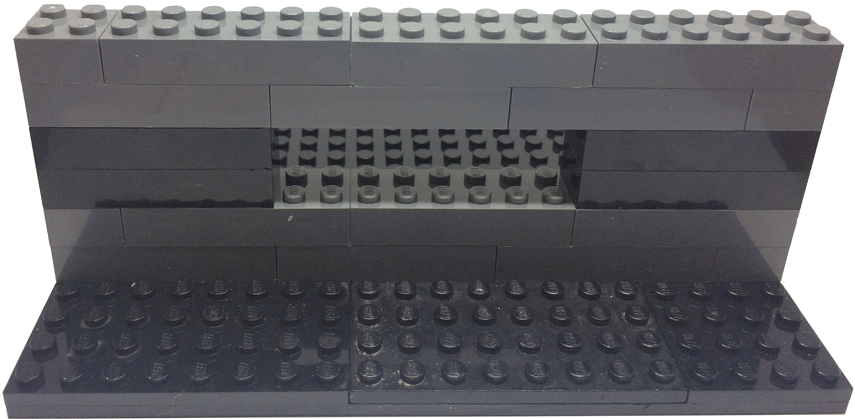
Finally, place 2 building bricks together at each end of the overhang, capped by a 2x2 black brick. This will give extra height to the column, matching the six row wall.
Second Floor
BOM for this section:
| Quantity | Type | Colour | Size |
|---|---|---|---|
| 2 | Plates | Black | 20x20 |
| 4 | Plates | Black | 4x8 |
| 2 | Plates | Black | 4x4 |
| 4 | Stackable/Column Brick | Black | 1x16 |
| 24 | Brick | Black | 2x6 |
| 2 | Brick | Black | 2x4 |
| 6 | Brick | Black | 2x2 |
| 8 | Brick | Grey | 2x6 |
| 2 | Brick | Grey | 2x2 |
Step 8
Build the base plate (floor) as per steps 4 and 5.
Step 9
As per Step 7, but starting with black, instead of grey, bricks.
Third Floor
BOM for this section:
| Quantity | Type | Colour | Size |
|---|---|---|---|
| 2 | Plates | Black | 20x20 |
| 4 | Plates | Black | 4x8 |
| 2 | Plates | Black | 4x4 |
| 4 | Stackable/Column Brick | Black | 1x16 |
| 24 | Brick | Grey | 2x6 |
| 2 | Brick | Grey | 2x4 |
| 6 | Brick | Grey | 2x2 |
| 8 | Brick | Black | 2x6 |
| 2 | Brick | Black | 2x2 |
A repeat of steps 4, 5 and 7 (grey bricks).
Roof
BOM for this section:
| Quantity | Type | Colour | Size |
|---|---|---|---|
| 2 | Plates | Black | 20x20 |
| 4 | Roof Tiles | Black | 2x8/45˚ |
| 2 | Roof Tiles | Black | 2x4/45˚ |
| 8 | Flat Tiles | Grey | 1x8 |
| 4 | Flat Tiles | Grey | 1x4 |
The top of the rack (roof, if you will) is built with the same overhang base plates, then finished off by 2x8/45˚ and 2x4/45˚ black roof tiles, and capped by two 1x8 and one 1x4 grey smooth plates to the sides. The front and back of the roof are finished off with one 1x16 and one 1x4 black bricks capped by two 1x6 and one 1x8 grey smooth plates.
The Work so Far
We now we have a rack that will suit most people.

I myself wanted the rack to have a working door. Off course, it is not essential, but I just enjoyed the challenge… ![]()
The Door
BOM for this section:
| Quantity | Type | Colour | Size |
|---|---|---|---|
| 4 | Corner Brick | Grey | 1x2 |
| 18 | Brick | Grey | 1x4 |
| 2 | Brick | Grey | 1x3 |
| 1 | Brick | Grey | 1x2 |
| 2 | Plate | Grey | 2x16 |
| 4 | Plate | Grey | 2x12 |
| 6 | Plate | Grey | 2x10 |
| 5 | Plate | Grey | 2x8 |
| 3 | Plate | Grey | 2x6 |
| 2 | Plate | Grey | 2x4 |
| 2 | Plate | Grey | 1x2 |
| 2 | Angle Plate | Grey | 1x2/2x2 |
| 4 | Hinge Plate Locking Dual Finger on End | Black | 1x2 |
| 4 | Hinge Plate Locking Single Finger on Top | Grey | 1x2 |
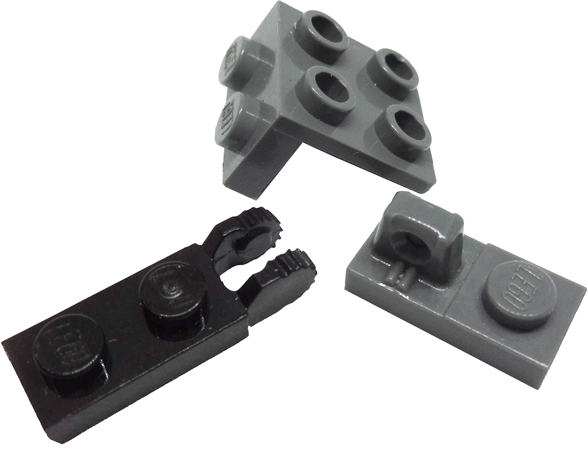
Designing and building the door frame was reasonably easy, but the hinges (ah the hinges) proved to be a much tougher nut to crack. There are plenty of different, nice looking hinges out there and I tested most of them. Some come fully assembled, some are hard to put together, but all proved to be either too weak to support the door or just impossible to attach to the frame. The one thing I didn’t want was to glue any parts together…
I had to come up with a custom design, and it proved to be not only strong enough to hold the door, but also pretty reliable in operation. The hinges are built by using four Hinge Plate Locking Dual Finger on End (black), four Hinge Plate Locking Single Finger on Top (grey) and two 1x2/2x2 grey Angle Plates.
Well, lets get on with the program…
Step 10
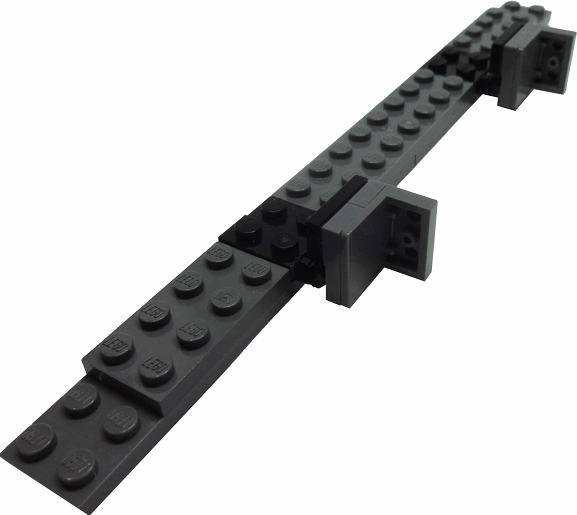
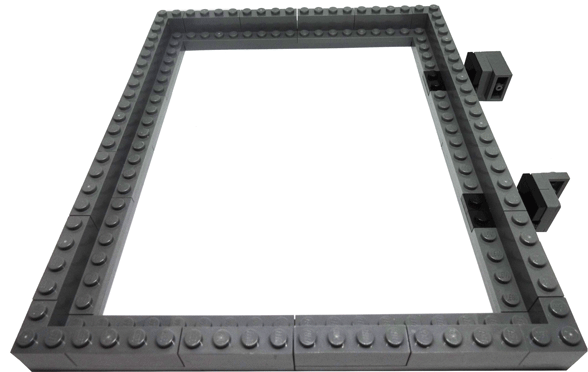
The basic shape for the door frame is built by arranging two 2x16 grey plates (width) and four 2x12 grey plates (height).

Step 11
On the hinge side, start joining the base plate with one 2x4 grey plate offset by two dots; leave another two dots free and add one 2x6 grey plate. Finally, skip another two dots and add a second 2x4 grey plate.

Step 12
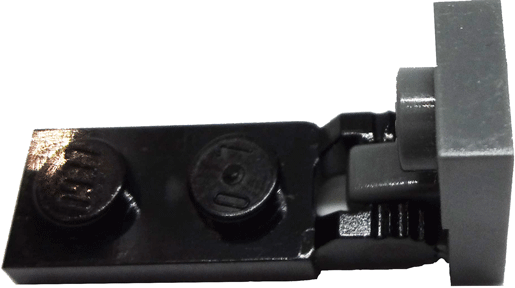
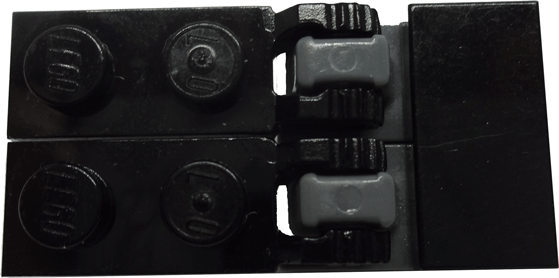
Place two black hinge plates (with the two “fingers”) on each gap between the 2x4 and 2x6 plates, and connected to the grey hinge plates (“single finger on top”); the hinges are finished off by two 1x2 black smooth plates. Finally, attach the angle plates.

I couldn’t find a mounting position for the hinges that would line up correctly with the distance between two overhangs. The top hinge needs to be “packed” with one 1x4 grey brick and two 1x2 grey plates to compensate for this.
Step 13
On the handle side, the base plates are simply joined by three 2x6 plates offset by two dots either side.
Step 14
The top and bottom base plates are fixed by adding two 2x10 grey plates, starting from the free 2x2 space on each of the side plates.
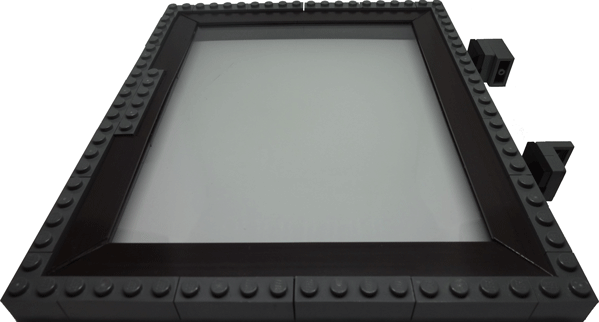
The complete door base frame:

Step 15
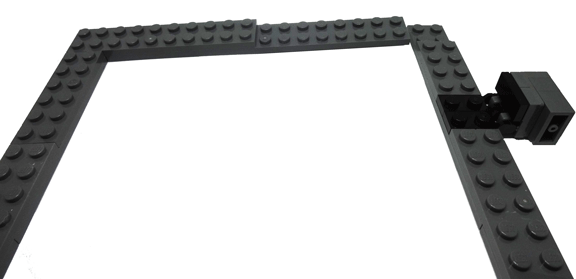
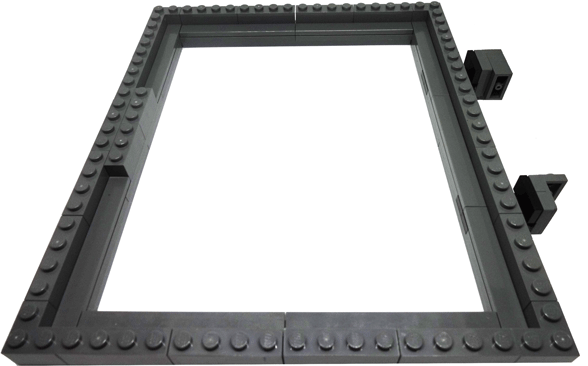
Starting with the 1x2 corner bricks, add grey 1x4 bricks around the outer perimeter of the base frame.

Note that on the handle side, an extra two 1x3 (or one 1x6) grey bricks are set in the middle of the lower perimeter; those bricks form the basis where the door handle itself will sit.

Step 16
To finish off the inner frame, place 1x8 grey smooth plates around the inner perimeter. Note that on the hinge side, one 1x6 grey smooth plate is placed between the two 1x8 plates.
The Glass
BOM for this section:
| Quantity | Type | Colour | Size |
|---|---|---|---|
| 1 | Midwest Polyester Clear Sheet Single | Clear | 0.06 mm |
| 1 | Stix2 Self-Adhesive Magnetic Tape | Brown | 3 m |
| 1 | Modelcraft Universal Razor Saw | N/A | N/A |
Note: I used a razor saw, but I suppose a sharp pair of scissors would also do the trick.
Step 17
Measure and cut the polyester sheet to the desired size. In this case, the sheet was cut to a size of 144mm x 175mm, which fits snuggly within the inner edge of the door frame. On the handle side of the frame, a cut measuring 50mm x 10mm is also required in order for the glass to wrap around the door handle itself. The glass is then framed with the magnetic tape (both sides):
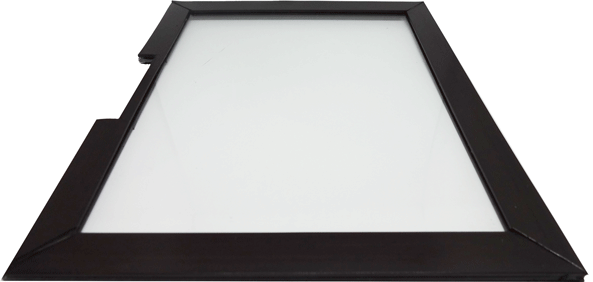
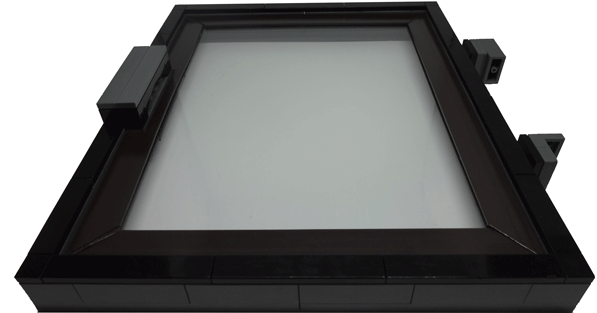
Step 18
Carefully place the polyester sheet within the door frame. As mentioned above, the glass sits very snugly within the frame and might require some gentle persuasion when fit to the frame.
Door Finish
BOM for this section:
| Quantity | Type | Colour | Size |
|---|---|---|---|
| 2 | Arch Continuous Bow | Black | 1x6 |
| 2 | Flat Tiles | Grey | 1x6 |
| 9 | Flat Tiles | Black | 1x6 |
| 5 | Flat Tiles | Black | 1x4 |
| 4 | Flat Tiles | Black | 1x1 |
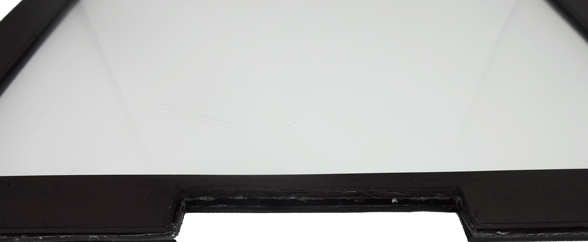
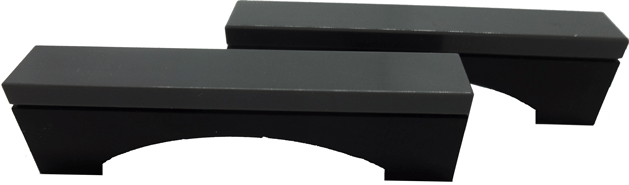
The handle is made up of two black arch continuous bows capped off by 1x6 grey tiles:
With the glass and handle in place, the only thing left is to cap the outer frame bricks with smooth black tiles.
Starting with one 1x1 black smooth tile at the corners, add six 1x6 smooth black tiles to the top and bottom edges; three 1x6 and one 1x4 black smooth tiles to the hinge side and four 1x4 black smooth tiles to the handle side.

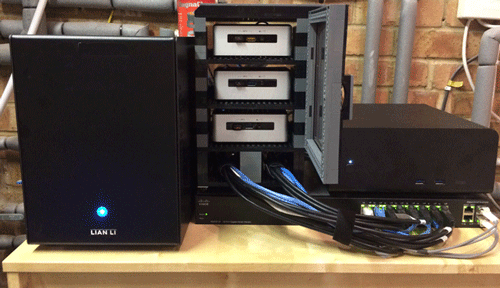
The NUCRac
Now, we simply attach the assembled door to the frame: the top hinge goes into the overhang of the second floor and the bottom hinge into the overhang of the first floor. And that’s it, the rack is complete:
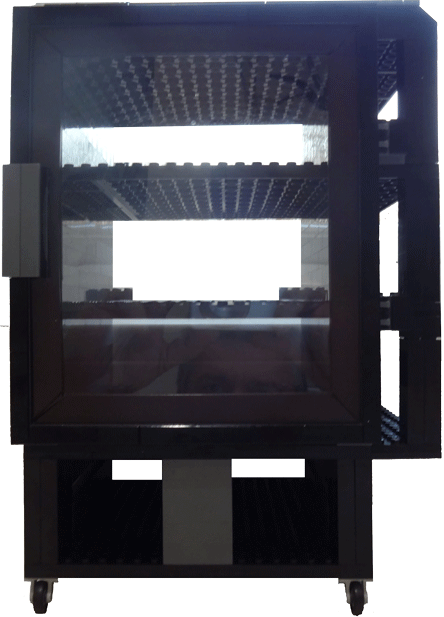

What could be better?
Well, the top of the NUCs are very close to the “floor” above and it is very difficult to reach the power button. It is not much of a problem, because I don’t expect to be powering the NUCs up and down on a regular basis. Besides, my NUCs all have vPro/AMT, so I can use the remote out-of-band features to power them up. ![]()
As I was preparing this guide I thought about changing the height of the sections by an extra row of bricks, however, that would change the proportions of the door – I just didn’t feel like re-designing it all again…
Parting Shot
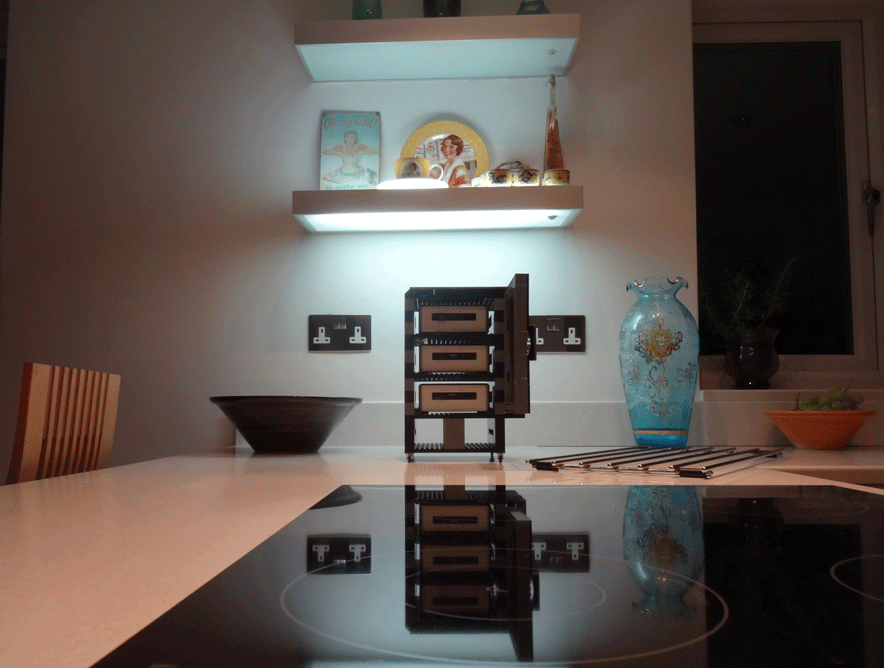
Lastly, the wife (![]() ) was so happy with the end product, she decided it could stay in the kitchen…
) was so happy with the end product, she decided it could stay in the kitchen…


Leave a Comment